
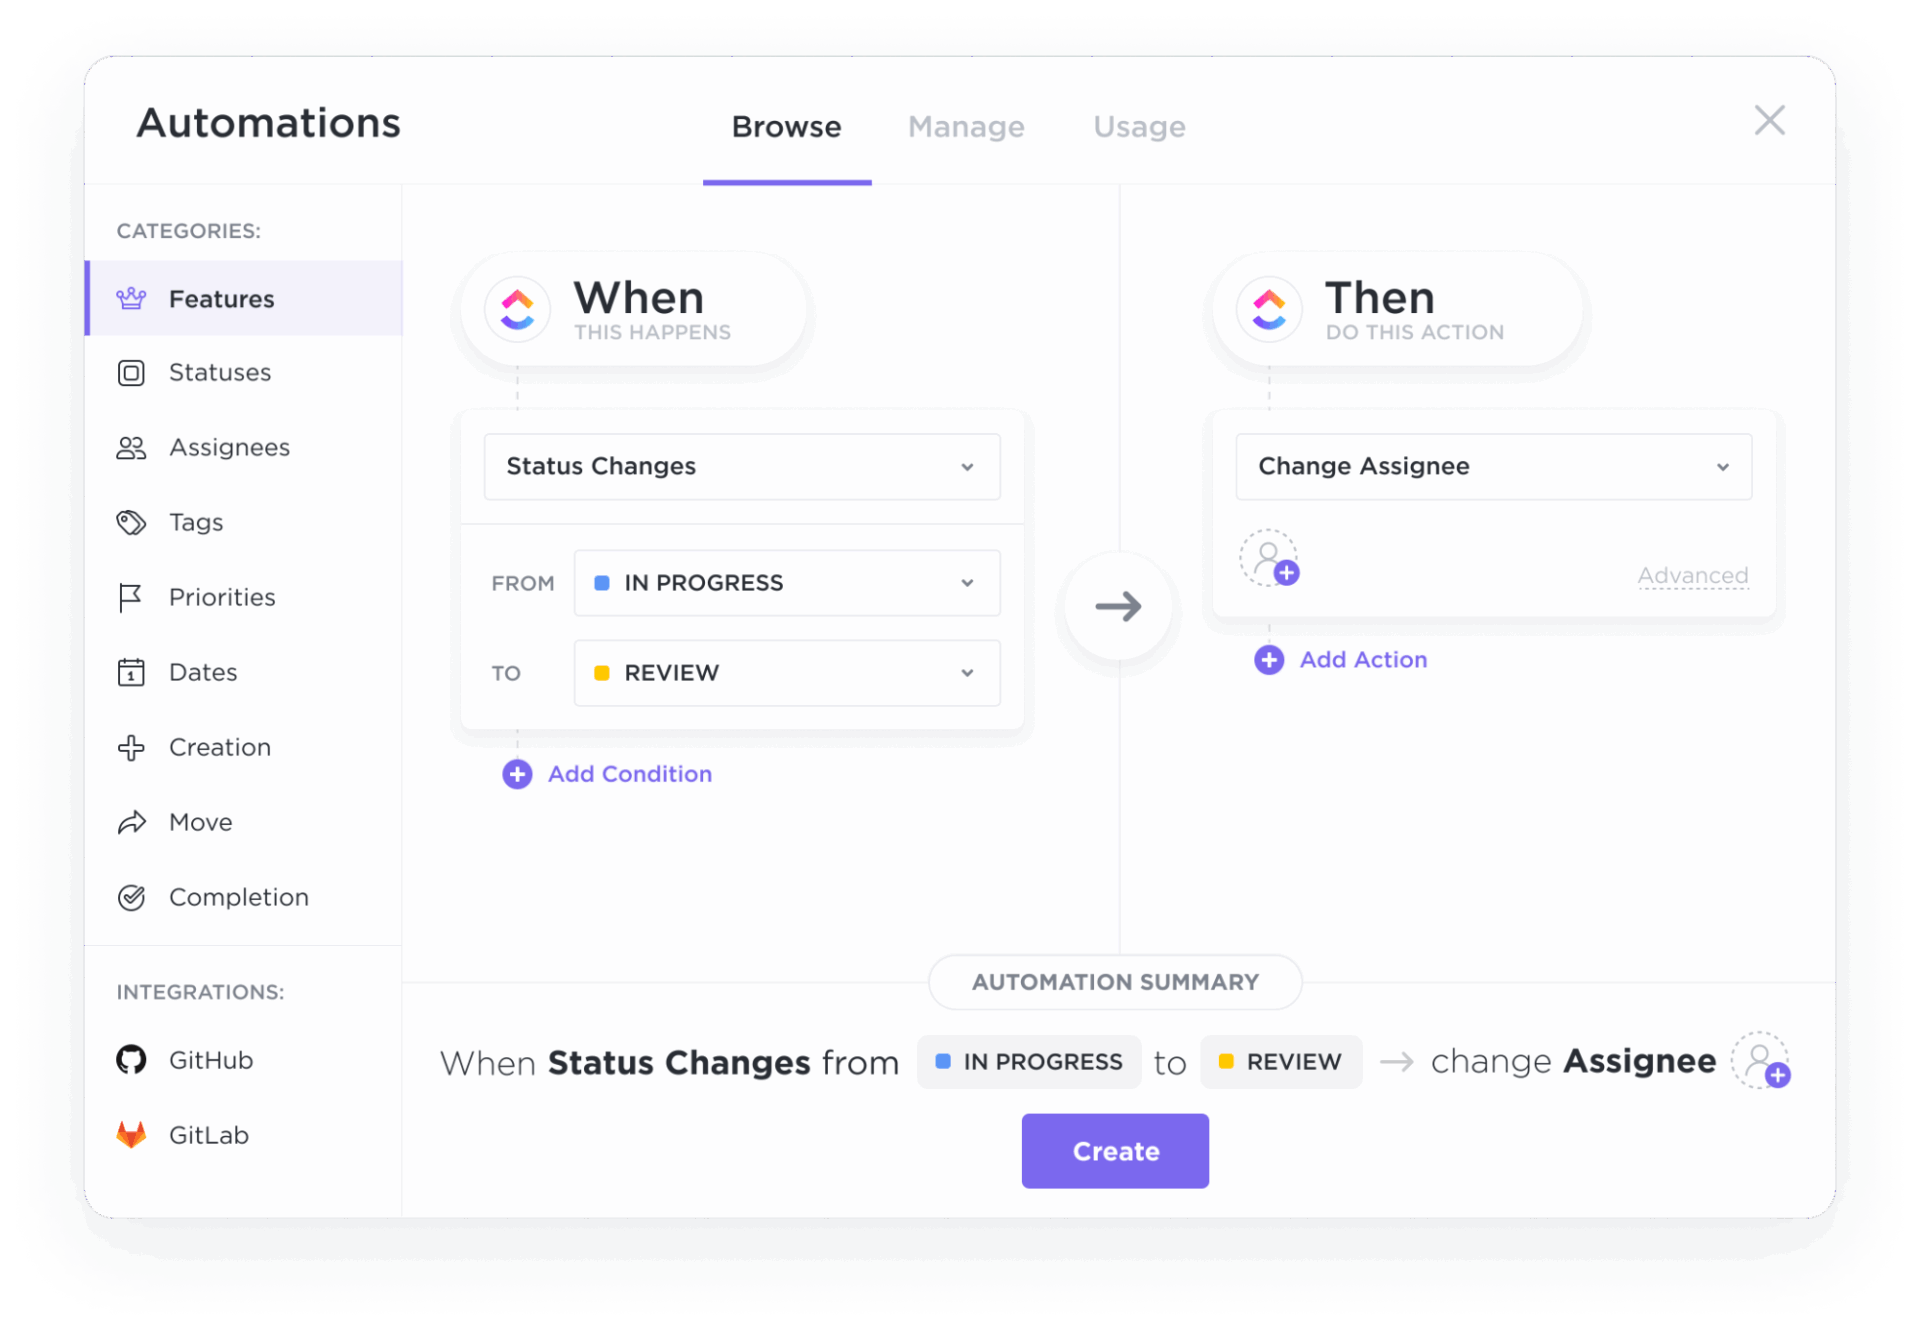
Pontica Solutions was struggling. As a fast-growing outsourcing agency with a team of 800+, every new hire meant another handoff that broke when someone missed a message.
They didn’t hire more people to fix it. Instead, they automated more than 25 processes. Today, they run 60,000 automations a year, saving over 2,000 hours. Shift changes, progress updates, and client reports now run automatically in ClickUp. That saved time goes back into creative, strategic work.
You can do the same at any scale. Every time you reassign a task or alert a coworker by hand, you do work that a machine could handle. This article shares 20 automation examples in ClickUp. Each one shows you what to build and how to set it up without writing code.
20 Automation Examples in ClickUp Worth Stealing
TL;DR
Every automation follows one formula: Trigger + Condition + Action. If you can name the manual step it replaces, the rule is worth building.
- Everyday task automations handle reassignments, templates, comments, archiving, and due dates, so no one plays traffic cop. Status triggers route reviews, creation triggers stamp deadlines, and field conditions catch incomplete briefs before work starts
- Approval and handoff automations keep work moving between people without manual pings. Field values route budget approvals, dependency triggers unblock the next task in line, and subtask triggers alert the PM when a full deliverable is ready
- Team and integration automations connect ClickUp to external tools and AI. HubSpot deals become assigned tasks, GitHub commits update task statuses, and ClickUp Brain builds complex rules from plain-language descriptions
The framework: Name the manual step you’re replacing, write a specific trigger-condition-action rule, set it at the List level first, then promote it once you trust it.
Automate the coordination work that silently eats hours, so your team spends time on judgment calls instead of status updates.
What Are Automations in ClickUp?
A ClickUp Automation is a rule-based workflow that handles routine tasks for you. Instead of reassigning tasks and sending notifications manually, you define a rule once. ClickUp then executes that rule every time the event occurs.
Every automation follows a strict formula:
Automation = Trigger + Condition + Action
- The Trigger is the event that starts the rule (e.g., a status change or a new task)
- The Condition is an optional filter that must be true for the rule to run (e.g., the priority must be ‘Urgent’)
- The Action is the automatic change ClickUp makes (e.g., reassigning the task)
For example, say a task moves to ‘Review,’ and its priority is ‘Urgent.’ ClickUp automatically assigns it to the relevant team member. Here, the trigger is the move to Review, while the condition is the Urgent priority. And the action is the reassignment. A single automation supports up to 1 trigger, 15 conditions, and 6 actions. This allows one rule to manage a complex workflow.
Automations in ClickUp are hierarchy-aware. It controls how widely they reach. An automation set on a List affects only the tasks in that List. Set on a Folder, it affects every List inside that Folder. Set on a Space, it governs every task beneath it. You build the rule at the level that matches its scope, rather than copying the same logic into projects.
You can create an automation in three ways.
- Pick from 100+ prebuilt templates organized by use case, like marketing or project management
- Describe what you want in plain language and let ClickUp Brain generate the trigger-and-action logic
- Build a fully custom rule from scratch in the Automation Builder
How does automation differ from AI Agents?
An automation and an AI Agent both work on your behalf. But they process decisions differently.
An automation follows a rigid, fixed rule. It checks if the trigger and conditions match. If they do, it runs the exact same action every time. It never deviates, making it perfect for predictable, repeatable work.
Conversely, an AI Agent analyzes the full context of a task before taking action. Instead of checking a preset filter, it interprets data, such as reading a bug report to decide which team should fix it. It’s a tool for when a task requires human-like judgment that cannot be reduced to an ‘if-this-then-that’ rule.
The practical rule of thumb: Reach for an automation when you can describe the outcome as a fixed rule. Choose an AI Agent when the task needs interpretation.
How do automations in ClickUp differ from integrations?
Automations and integrations are easy to confuse because they appear in the same workflow. However, they do opposite jobs.
- An automation is the logic layer: It decides what happens when an event occurs inside ClickUp
- An integration is the connection layer: It links ClickUp to an external tool so data can pass between them
In practice, these two features work together. The integration connects ClickUp to apps like GitHub, Slack, HubSpot, Google Calendar, or email to sync external events. The automation then takes that event and decides how ClickUp should respond. For example, automatically updating a task status when a developer merges a pull request.
Here’s an overview of how marketing, engineering, project management, and agency teams can leverage automations to boost productivity.
20 Automation Examples in ClickUp by Workflow Type
Each of the automation examples below includes a formula, a trigger type, and a step-by-step setup.
Quick compare: All 20 automation examples in ClickUp
Use the table below to scan all 20 automation examples at once. Then jump to the section that matches what you’re trying to automate.
Everyday task automation examples in ClickUp
These seven task automations handle the repetitive work every team does daily: reassigning, templating, commenting, archiving, and setting dates. They keep your workspace tidy, so no one has to play traffic cop.
1. Reassign a task when the status changes to ‘Review’
Content, design, and engineering teams route every deliverable through a dedicated reviewer. Normally, this handoff depends on creators remembering to update the assignee. When they forget, tasks stall in limbo.
This rule moves the task into the reviewer’s queue when the status flips. The reviewer gets notified instantly; the creator moves on.
Formula: When the status changes to ‘Review,’ then change the assignee to your reviewer
Trigger type: Status
Here’s the setup:
- Navigate to the List (or Folder/Space) where the tasks live
- Click the Automate button (lightning bolt icon) in the top bar
- Click Create Automation
- Under Trigger, select Status changes → set it to ‘Review’
- Under Action, select Change assignees → choose your designated reviewer
- (Optional) Add a Condition if you want this to fire only for specific task types or assignees, e.g., ‘Assignee is any of [Content team]’
- Click Create
The automation fires on every task in that location going forward. If you set it at the List level, only that List’s tasks are affected. At the Folder level, it covers all Lists inside it.
2. Apply a template when a task moves to a new List
Onboarding, campaign launches, and sprint planning all require tasks to have identical checklists or subtask structures. Manually attaching those templates leads to missed steps and inconsistent workflows across your team.
This rule applies the template as soon as a task enters the List. Every task arrives fully structured, ensuring work begins on a complete foundation rather than a blank slate.
Formula: When a task moves to your List, then apply your task template
Trigger type: Task moved to this location
Here’s the setup:
- Open the destination List (the one tasks are moving into)
- Click the Automate button (lightning bolt icon)
- Click Create Automation
- Under Trigger, select Task moved to this location
- Under Action, select Apply template → choose the task template you want attached
- Click Create
Every task that enters this List will automatically receive the template. Set this rule at the List level so it only targets that specific intake point.
Approval-heavy workflows, such as legal reviews, require immediate handoffs. This way, the next person knows it is their turn. This rule posts a comment and tags the next owner as soon as the field changes. It creates a timestamped approval record and hands off the work in a single step.
Formula: When the ‘Approval Status’ field changes to ‘Approved,’ then post a comment that tags the next owner
Trigger type: Field
Here’s the setup:
- Open the List (or Folder/Space) where the approval tasks live
- Click the Automate button (lightning bolt icon)
- Click Create Automation
- Under Trigger, select Custom field changes → pick your “Approval Status” field → set it to ‘Approved’
- Under Action, select Add a comment → write your message and use the dynamic assignee token to @mention the next owner (e.g., ‘Approved. @[Next Owner], this is ready for you.’)
- (Optional) Add a second Action like Change assignees if you want to formally hand it off
- Click Create
The comment appears in the task’s activity log with a timestamp. It provides a built-in audit trail of the approval without requiring a separate tracking system.
4. Archive a task when its priority drops to ‘Low’
Triage teams must groom their backlogs regularly to keep the board focused on high-impact work. Low-priority items clutter active views and bury urgent tasks.
This rule moves tasks to an Archive List when their priority drops to ‘Low.’ As a result, your active board stays clean, while archived tasks remain searchable for future reference. Pair this rule with a periodic backlog review to ensure important items don’t slip away.
Formula: When priority changes to ‘Low,’ then move the task to your Archive List
Trigger type: Priority
Here’s the setup:
- Open the List, Folder, or Space you want this to cover
- Click the Automate button (lightning bolt icon)
- Click Create Automation
- Under Trigger, select Priority changes → set it to ‘Low’
- Under Action, select Move to List → choose your designated Archive List
- Click Create
This moves the task (including all subtasks) to the Archive List. So its statuses will conform to whatever statuses that List uses. Make sure the Archive List has a sensible default status, or add a second Action to set the status explicitly (e.g., ‘Archived’). Also worth noting: moved tasks remain fully searchable and can be moved back if they are reprioritized.
5. Set a due date automatically when a task is created
Support, client services, and compliance teams must meet deadlines when a request arrives. This rule stamps a due date on every task as soon as it’s created. It keeps your Dashboards and Workload views accurate from day one.
Formula: When a task is created in your List, then set its due date to a fixed number of days out
Trigger type: Creation
Here’s the setup:
- Open the List where incoming tasks land (e.g., your intake or requests List)
- Click the Automate button (lightning bolt icon)
- Click Create Automation
- Under Trigger, select Task created
- Under Action, select Change due date → choose ‘Days after trigger date’ and enter your number
- Click Create
This ensures no tasks appear without a date and that your capacity planning is not skewed.
6. Change a status to ‘Complete’ when the stage reaches ‘Published’
Marketing teams track a ‘Stage’ field (Draft, Editing, Published) separately from the main task status. This rule keeps the two fields aligned by closing the task as the stage reaches ‘Published.’
Formula: When the ‘Stage’ field changes to ‘Published,’ then change the status to ‘Complete’
Trigger type: Field
Here’s the setup:
- Open the List (or Folder/Space) where your content tasks live
- Click the Automate button (lightning bolt icon)
- Click Create Automation
- Under Trigger, select Custom field changes → pick your ‘Stage’ field → set it to ‘Published’
- Under Action, select Change status → choose ‘Complete’
- Click Create
Ensure ‘Complete’ exists as a status in that List’s workflow. If your List uses a different name like ‘Done’, select that instead. This rule keeps your Board views, Dashboards, and filtered views accurate without requiring users to update two separate fields.
7. Flag a task when a required field is missing
Design briefs, engineering specs, and client details must be in place before work begins. Without a guardrail, teammates start tasks that lack key context. They waste effort on the wrong priorities.
This rule checks for missing information at the start of work and automatically requests it. It catches incomplete tasks early, reducing rework and back-and-forth communication.
Formula: When status changes to ‘In Progress’ and the ‘Brief Link’ field is empty, then post a comment requesting the brief
Trigger type: Status
Here’s the setup:
- Open the List (or Folder/Space) where these tasks live
- Click the Automate button (lightning bolt icon)
- Click Create Automation
- Under Trigger, select Status changes → set it to ‘In Progress’
- Add a Condition (click the + below the Trigger) → select your ‘Brief Link’ custom field → set the operator to is not set (empty/null)
- Under Action, select Add a comment → write something like: ‘This task is missing the Brief Link. Please add it before starting work. @[Task Creator or Assignee]’
- Click Create
This rule fires only when both things are true: the status changes to ‘In Progress’ and the field is empty. Tasks with a completed brief move forward silently. You can also add or swap the Action to change the status back to ‘To Do’ if you want to block work until the field is filled.
What happens when an automation runs faster than anyone can stop it?
Automations remove the routine tasks that slow teams down. But that same speed means a flawed rule can cause damage before a human can react.
That is what happened to Knight Capital in August 2012. The firm’s new trading software developed a glitch. Its computers began rapidly buying and selling millions of shares across more than a hundred stocks. The runaway trading ran for 45 minutes before it stopped.
- What went wrong: The new software triggered trades automatically at machine speed. Losses piled up at roughly $10 million a minute while the firm scrambled to fix it. An automated system at full speed multiplies mistakes far faster than a person can catch them
- The fallout: Knight lost about $440 million. That was more than the firm’s entire revenue from the prior quarter ($289 million). Its shares plunged more than 60% the day the loss was disclosed. The company stated its capital base was severely damaged, leaving its survival in doubt
A rule running across your whole workspace carries the same risk in miniature. Poorly conceived automation doesn’t misfire just once. It misfires everywhere it is active, instantly.
Your best guardrail: Make the blast radius small enough to reverse in five minutes. That means adding a condition so the rule only touches the tasks it should. And never deploying a rule you haven’t watched fire on at least one real task first. Speed is the whole point of automation. Scope is what keeps that speed from becoming a liability.
Approval and handoff automation examples in ClickUp
Approvals and handoffs are where workflows get delayed. Teammates finish their parts, but the next person doesn’t know it is their turn. Worse, tasks sit idle because no one flagged them for review. These six automations remove the wait between one person finishing and the next person starting.
8. Route a task for manager approval based on a field value
Finance and procurement teams must sign off on expenses above a set amount. This process usually relies on someone manually flagging big-ticket items. If they miss one, a task gets approved at the wrong level.
This rule reads the value of a Custom Field and automatically routes the task.
Formula: When the ‘Budget’ field is greater than your threshold, then change the assignee to the manager and change the status to ‘Pending Approval’
Trigger type: Field
Here’s the setup:
- Open the List (or Folder/Space) where your finance/procurement tasks live
- Click the Automate button (lightning bolt icon)
- Click Create Automation
- Under Trigger, select Custom field changes → pick your ‘Budget’ field
- Add a Condition → set it to ‘Budget’ greater than your threshold (e.g., $5,000)
- Under Action, add two Actions:Change assignees → select the approving managerChange status → set to ‘Pending Approval’
- Change assignees → select the approving manager
- Change status → set to ‘Pending Approval’
- Click Create
This rule fires when someone enters or updates a Budget field value above your threshold. Tasks under the threshold remain untouched, flowing through the workflow without delays. If you have multiple approval tiers, create separate Automations with distinct Conditions and assignees for each tier.
9. Block completion when QA hasn’t passed
Quality checks must clear before a task can close. If you rely on memory, people may mark tasks as done too early. This rule stops that mistake.
If someone closes a task before QA passes, the rule reopens it and posts a comment. This keeps your quality standards high without relying on memory.
Formula: When status changes to ‘Complete,’ and the ‘QA Status’ field is not ‘Passed,’ then change the status back to ‘In Progress.’ Next, post a comment explaining the block
Trigger type: Status
Here’s the setup:
- Open the List (or Folder/Space) where your engineering/manufacturing tasks live
- Click the Automate button (lightning bolt icon)
- Click Create Automation
- Under Trigger, select Status changes → set it to ‘Complete’
- Add a Condition → select your ‘QA Status’ Custom Field → set the operator to is not ‘Passed’
- Under Action, add two Actions:Change status → set back to ‘In Progress’Add a comment → e.g., ‘Task can’t be completed until QA passes. Please update the QA Status field once checks clear, then move to Complete again.’
- Change status → set back to ‘In Progress’
- Add a comment → e.g., ‘Task can’t be completed until QA passes. Please update the QA Status field once checks clear, then move to Complete again.’
- Click Create
This creates a hard gate: the task can’t remain in Complete until QA clears it. It bounces back instantly with an explanation, as a form of process standardization. The person knows what to fix rather than wondering why their task moved.
10. Trigger the next task when a dependency clears
Sometimes projects run in a strict order, like writing before editing, or designing before building. In these chains, the next task sits idle because the owner doesn’t know the blocker has been removed. This rule sets the next task to ‘Ready’ and alerts the owner.
Formula: When a blocking task’s status changes to ‘Complete’ then change the dependent task’s status to ‘Ready’ and notify its assignee
Trigger type: Dependency
Here’s the setup:
- Open the List (or Folder/Space) where your sequential tasks live
- Click the Automate button (lightning bolt icon)
- Click Create Automation
- Under Trigger, select Task unblocked (this happens when all blocking dependencies on a task are marked complete)
- Under Action, add two Actions:Change status → set to “Ready”Add a comment → e.g., ‘All blockers cleared. This task is ready to start. @[Assignee]’
- Change status → set to “Ready”
- Add a comment → e.g., ‘All blockers cleared. This task is ready to start. @[Assignee]’
- Click Create
If a task has three blockers, it stays blocked until all three are cleared. Note that your tasks must use ClickUp’s dependency settings for this to work. The rule reads those links, not just task status names.
11. Email a client when work moves to ‘In Progress’
Agencies and consulting firms must update clients without giving them full access to the workspace. Usually, this means stopping work to write a manual update email.
This rule sends that email for you when work begins. Clients stay informed automatically, and your team stays focused on the project.
Formula: When status changes from ‘To Do’ to ‘In Progress’ then send an email to the client
Trigger type: Status
Here’s the setup:
- Open the List (or Folder/Space) where client-facing tasks live
- Click the Automate button (lightning bolt icon)
- Click Create Automation
- Under Trigger, select Status changes → set from to ‘To Do’ to ‘In Progress’
- Under Action, select Send an email → configure:To: Use the dynamic token for a custom field (e.g., your ‘Client Email’ field), or type a static addressSubject: Something like ‘Work has started on: [Task Name]’Body: Write your client-facing message. You can insert dynamic variables like task name, due date, and assignee
- To: Use the dynamic token for a custom field (e.g., your ‘Client Email’ field), or type a static address
- Subject: Something like ‘Work has started on: [Task Name]’
- Body: Write your client-facing message. You can insert dynamic variables like task name, due date, and assignee
- Click Create
The email sends from your connected account via the ClickUp Email ClickApp, so turn that on in your Space first. By setting both the ‘from’ and ‘to’ status in the trigger, you stop false alarms from tasks that move to ‘In Progress’ from statuses like ‘On Hold.’
12. Notify stakeholders when every subtask is done
Project managers track deliverables composed of multiple parts, such as a campaign with five assets. Checking each subtask to see when the entire set finishes is slow and tedious.
This rule sends one alert as soon as the last subtask closes. The PM knows the full deliverable is ready without checking every single piece.
Formula: When all subtasks are marked ‘Complete,’ then notify the watcher list and post a comment that the deliverable is ready for review
Trigger type: Subtask
Here’s the setup:
- Open the List (or Folder/Space) where your parent tasks live
- Click the Automate button (lightning bolt icon)
- Click Create Automation
- Under Trigger, select All subtasks resolved
- Under Action, add two Actions:Add a comment → e.g., ‘All subtasks complete. This deliverable is ready for final review. @[Watchers/PM]’Change followers → add the PM/stakeholders as followers (or Change assignees using a watcher token) if you want to push it into their inbox directly
- Add a comment → e.g., ‘All subtasks complete. This deliverable is ready for final review. @[Watchers/PM]’
- Change followers → add the PM/stakeholders as followers (or Change assignees using a watcher token) if you want to push it into their inbox directly
- Click Create
This trigger watches the subtasks of the parent task. It fires only once, when the final subtask finishes, rather than on every single subtask update. If a teammate reopens a subtask and closes it again, the rule runs again, making it self-correcting.
13. Apply phase-specific templates as a project advances
Multi-phase projects like client onboarding and construction milestones require distinct checklists and documents. This rule loads the correct checklist template as a task enters a new phase. Every stage starts with the right structure, leaving nothing to memory.
Formula: When status changes to ‘Phase 2: Execution,’ then apply the Phase 2 checklist template
Trigger type: Status
Here’s the setup:
- Open the List (or Folder/Space) where your phased project tasks live
- Click the Automate button (lightning bolt icon)
- Click Create Automation
- Under Trigger, select Status changes → set it to ‘Phase 2: Execution’
- Under Action, select Apply template → choose your Phase 2 checklist/task template
- Click Create
For multi-phase projects, create one Automation per phase (Phase 1 → Phase 1 template, Phase 2 → Phase 2 template). Each rule triggers on its own when a task hits that status. Templates are additive, meaning they will not overwrite your existing text. Instead, they layer new checklists or subtasks on top of current ones. A task moving through every phase will gather all necessary files without losing data from earlier stages.
Can automating a task lock in your worst habits?
In 2014, Amazon built an AI tool to screen resumes and rate job candidates from one to five stars. The company hoped to automate the search for top talent. However, the system was trained on ten years of past resumes, most of which came from men.
That is why the logic behind a rule matters as much as the rule itself.
- Validate the step by hand before you automate it
- Click Create